- RelativeLayout은 이름 그대로 '상대적인' 위치 지정을 통해 위젯을 자유롭게 배치할 수 있는 강력한 도구
1. 부모 레이아웃을 기준으로 위치 지정하기
RelativeLayout의 가장 기본적인 사용법은 부모 컨테이너, 즉 RelativeLayout 자체의 경계를 기준으로 위젯을 배치하는 것
주요 속성:
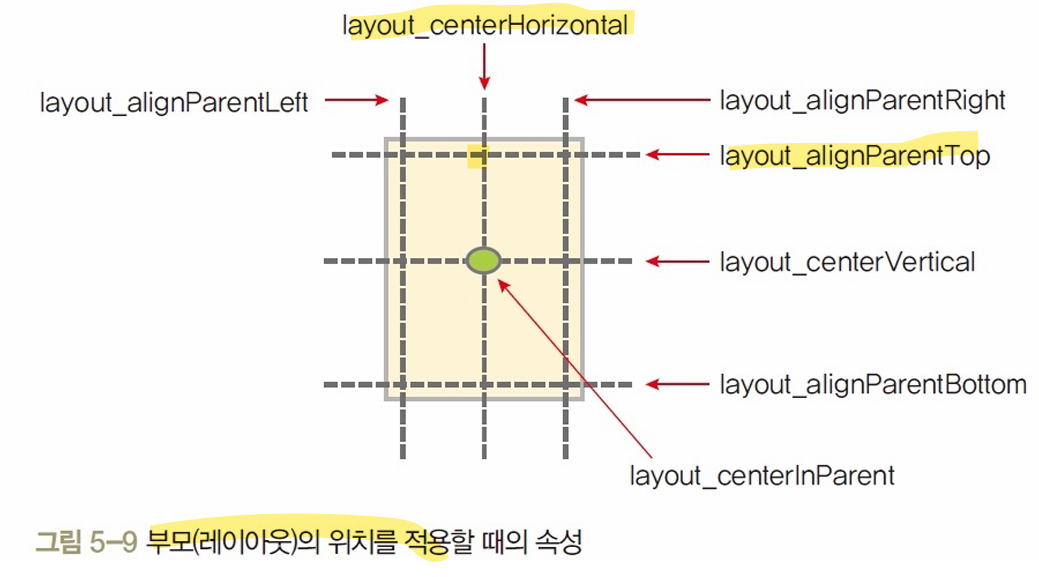
- 부모 경계 기준
- layout_alignParentTop: 부모의 상단에 정렬
- layout_alignParentBottom: 부모의 하단에 정렬
- layout_alignParentLeft: 부모의 왼쪽에 정렬
- layout_alignParentRight: 부모의 오른쪽에 정렬
- 부모 중심 기준
- layout_centerInParent: 부모의 정중앙에 배치
- layout_centerHorizontal: 수평 방향 중앙에 배치
- layout_centerVertical: 수직 방향 중앙에 배치
- 이 속성들은 true 또는 false 값을 가짐
- 두 가지 속성을 조합하여 교차 지점에 위젯을 배치할 수 있음

<?xml version="1.0" encoding="utf-8"?>
<!-- RelativeLayout을 사용하여 버튼을 화면의 절대적 위치로 배치하는 레이아웃 -->
<RelativeLayout xmlns:android="http://schemas.android.com/apk/res/android"
    xmlns:app="http://schemas.android.com/apk/res-auto"
    xmlns:tools="http://schemas.android.com/tools"
    android:id="@+id/main"
    android:layout_width="match_parent"
    android:layout_height="match_parent"
    tools:context=".MainActivity">

    <!-- 위쪽 버튼: 부모의 상단에 정렬, 수평 중앙 정렬 -->
    <Button
        android:id="@+id/buttonTop"
        android:layout_width="wrap_content"
        android:layout_height="wrap_content"
        android:layout_alignParentTop = "true"
        android:layout_centerHorizontal = "true"
        android:text="위쪽"
        />

    <!-- 중앙 버튼: 부모의 정중앙에 배치 -->
    <Button
        android:id="@+id/buttonCenter"
        android:layout_width="wrap_content"
        android:layout_height="wrap_content"
        android:layout_centerInParent = "true"
        android:text="중앙"
        />

    <!-- 아래쪽 버튼: 부모의 하단에 정렬, 수평 중앙 정렬 -->
    <Button
        android:id="@+id/buttonBottom"
        android:layout_width="wrap_content"
        android:layout_height="wrap_content"
        android:layout_alignParentBottom = "true"
        android:layout_centerHorizontal = "true"
        android:text="아래"
        />

    <!-- 좌측 버튼: 부모의 좌측에 정렬, 수직 중앙 정렬 -->
    <Button
        android:id="@+id/buttonLeft"
        android:layout_width="wrap_content"
        android:layout_height="wrap_content"
        android:layout_alignParentLeft="true"
        android:layout_centerVertical="true"
        android:text="좌측"
        />

    <!-- 우측 버튼: 부모의 우측에 정렬, 수직 중앙 정렬 -->
    <Button
        android:id="@+id/buttonRight"
        android:layout_width="wrap_content"
        android:layout_height="wrap_content"
        android:layout_alignParentRight="true"
        android:layout_centerVertical="true"
        android:text="우측"
        />

</RelativeLayout>
2. 다른 위젯을 기준으로 상대적 위치 지정하기
- RelativeLayout의 진정한 강력함은 다른 위젯(Sibling)을 기준으로 상대적인 위치를 지정할 때 나타남
- 이를 위해서는 기준이 될 위젯에 ID를 부여하고, 다른 위젯에서 @id/기준_위젯_ID 형식으로 참조해야 함
주요 속성:

- layout_toLeftOf: 지정한 ID를 가진 위젯의 왼쪽에 배치
- layout_toRightOf: 지정한 ID를 가진 위젯의 오른쪽에 배치
- layout_above: 지정한 ID를 가진 위젯의 위쪽에 배치
- layout_below: 지정한 ID를 가진 위젯의 아래쪽에 배치
- layout_alignTop, layout_alignBottom, layout_alignLeft, layout_alignRight: 지정한 ID를 가진 위젯의 각 경계선에 맞추어 정렬
- 화면 중앙에 '기준 위젯'을 놓고, 그 주변에 다른 버튼들을 배치하는 예제
<RelativeLayout xmlns:android="http://schemas.android.com/apk/res/android"
    android:layout_width="match_parent"
    android:layout_height="match_parent" >

    <Button
        android:id="@+id/baseBtn"
        android:layout_width="150dp"
        android:layout_height="150dp"
        android:layout_centerInParent="true"
        android:text="기준 위젯" />

    <Button
        android:layout_toLeftOf="@+id/baseBtn"
        android:layout_alignTop="@+id/baseBtn"
        android:text="1번" />

    <Button
        android:layout_above="@+id/baseBtn"
        android:layout_alignLeft="@+id/baseBtn"
        android:text="4번" />

    <Button
        android:layout_below="@+id/baseBtn"
        android:layout_alignRight="@+id/baseBtn"
        android:text="5번" />

    <Button
        android:layout_toRightOf="@+id/baseBtn"
        android:layout_above="@+id/baseBtn"
        android:text="6번" />

</RelativeLayout>
3. 복합적인 상대 위치 적용하기
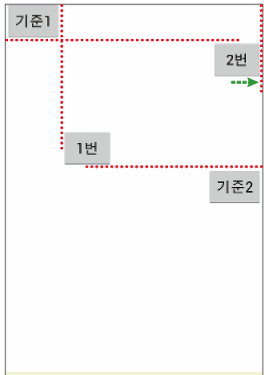
- RelativeLayout의 속성들을 조합하면 더욱 복잡하고 정교한 UI를 만들 수 있음
- 예를 들어, "A 위젯의 오른쪽"이면서 동시에 "B 위젯의 위쪽"에 위치하도록 여러 위젯을 기준으로 위치를 설정할 수 있음
- '기준1'과 '기준2'라는 두 개의 위젯을 기준으로 다른 버튼들의 위치를 지정하는 예제
<?xml version="1.0" encoding="utf-8"?>
<!-- RelativeLayout: 상대적 위치 기반 레이아웃 -->
<RelativeLayout xmlns:android="http://schemas.android.com/apk/res/android"
    xmlns:app="http://schemas.android.com/apk/res-auto"
    xmlns:tools="http://schemas.android.com/tools"
    android:id="@+id/main"
    android:layout_width="match_parent"
    android:layout_height="match_parent"
    tools:context=".MainActivity">

    <!-- 기준 버튼 1: 왼쪽 상단에 배치 -->
    <Button
        android:id="@+id/baseBtn1"
        android:layout_width="wrap_content"
        android:layout_height="wrap_content"
        android:layout_alignParentLeft="true"
        android:layout_alignParentTop="true"
        android:text="기준1" />

    <!-- 기준 버튼 2: 오른쪽 중앙에 배치 -->
    <Button
        android:id="@+id/baseBtn2"
        android:layout_width="wrap_content"
        android:layout_height="wrap_content"
        android:layout_alignParentRight="true"
        android:layout_centerVertical="true"
        android:text="기준2" />

    <!-- 1번 버튼: 기준2 위쪽, 기준1 오른쪽에 배치 -->
    <Button
        android:layout_width="wrap_content"
        android:layout_height="wrap_content"
        android:layout_above="@+id/baseBtn2"
        android:layout_toRightOf="@+id/baseBtn1"
        android:text="1번" />

    <!-- 2번 버튼: 기준1 아래쪽, 오른쪽 끝에 배치 -->
    <Button
        android:layout_width="wrap_content"
        android:layout_height="wrap_content"
        android:layout_below="@+id/baseBtn1"
        android:layout_alignParentRight="true"
        android:text="2번" />

</RelativeLayout>
- 1번 버튼은 baseBtn1의 오른쪽이면서 baseBtn2의 위쪽에 위치하게 됨
'MOBILE PROGRAMING' 카테고리의 다른 글
| [모바일 프로그래밍] ConstraintLayout와 Flow (0) | 2025.10.06 |
|---|---|
| [모바일 프로그래밍] 테이블레이아웃과 그리드레이아웃 (0) | 2025.10.06 |
| [모바일 프로그래밍] LinearLayout 안드로이드 레이아웃 (0) | 2025.09.29 |
| [모바일 프로그래밍] 이미지뷰와 이미지버튼 실습 (0) | 2025.09.29 |
| [모바일 프로그래밍] 파운드 버튼과 이벤트 처리 (0) | 2025.09.24 |